Jun 23, 2015

"Stamping Destroyed My Life" A Dear Paperlicious EXCLUSIVE

 Exclusive Excerpt:

"On a sunny Saturday in 2001, M walked into her local craft store looking for a 3 sided piece of poster board for her daughter's science fair project.  On her way to the poster board, M's eye caught a display of little jars of brightly colored powder nestled in a neat little row....  Although M did not know it at the time, her walk into a craft store that day was her first step towards a lifetime of heartache and sorrow, because that is the day that M became a stamper."

Dateline:  June 23, 2015

Press Release 


Once highly regarded, but now shunned, and using the pseudonym "M",  M will publish Stamping Destroyed My Life, it was announced this morning by Deefunct Publishing Co, LLC.

Stamping Destroyed My Life is the gripping story of how a suburban housewife with everything,  including a Scrapbox filled with hundreds of thousands of dollars of stamping paraphernalia, ended up sentenced to 3 to 5 years, with only a comic sans alphabet stamp set and a touch-too-orange red dye ink pad left in her roll on tote.

Its 466 pages are filled with snappy dialogue and a rapid-paced plot that rips off the lid of the stamping world.  Just a few of the topics M uncovers:
  • Design Team Nightmares
  • What happened when stampers learned that elephants and foxes do not really speak
  • Release Night Mania
  • Why instagram has so many pictures of cats
  • The differences between stampers in Washington State and stampers in Utah, and
  • What's in photopolymer that turns stampers into crackanistas (hint:  added sugar).
But this book isn't just about the stamping industry.

It's about M.

You will enter M's world, from home parties in the tony suburbs of Washington DC to the gritty subways of New York, where furtive stampers unload barely used supplies in exchange for a sneak peek at the next release of something.  Watch M on a stamping cruise, gulping watered-down margaritas while playing the penny slots to earn enough for "more".  See M at CHA, stealing designs and selling them to anyone who can explain the planner craze, and at a brad factory-turned-sequin factory in the far east, stuffing her carumba with precious round plastic gold pieces.

Live with M as she reaches the heights of the stamping industry only to fall victim to the very industry that breathed hot gun air into her mundane life.  Find out what grade her son got on the science fair project ....  and whether M can complete her sentence at a halfway house.

Stay tuned to this blog for further updates, including what famous retired person will play M in the movie!!!!!

Expected publication date:  2017
Expected movie release:  2020 

Next:  Prologue

Jun 22, 2015

Joining the Muse Challenge

Happy to share that I will be joining the Muse Challenge blog as a designer starting July 6th!  You can get the details here.  This challenge is an easy one because all I have to do is design something about once a month.  No pressure.  You are officially invited to play along.

Should be fun!

Thanks Ardyth for the opportunity. 

Jun 21, 2015

Muse Challenge #122: Balloons!


This evening I'm sharing a card I made inspired by Marion Vagg's great card, which you can also find here at the Muse Challenge Blog.  Marion's bright and bold birthday card (love it!!) has 3 balloons -- thus the source of my inspiration.  As usual, I'm posting my card right before the Monday morning deadline for the Muse Challenge but it took me most of the week to create something worth sharing....

WANT TO MAKE THIS?

Supplies:
  • watercolor paper
  • Tombow markers and Zig Gansai Tambi watercolors
  • water
  • paint brushes
  • paper towels
  • pencil
  • scrap copy paper
  • scissors
  • Micron black marker
  • Ranger Archival Black ink
  • Papertrey Ink
  • Big Shot die cut machine (to flatten the card)
  • Mod Podge Dimesional Magic
Steps:
  • Draw a large balloon on copy paper and cut out.
  • Draw a second, smaller, balloon and cut out.
  • Place the large balloon on a folded A2 card made out of watercolor paper and trace.
  • Do the same with the smaller balloons as shown.
  • Watercolor the large balloon, letting it dry between layers.
  • Do the same for the other balloons.
  • Pour a dime size of Mod Podge Dimensional Magic and paint over the lightest part of the balloons with a wet brush to add a bit of shine.
  • Stamp the sentiment, curving it to go with the balloon.
  • Decide sentiment is a bit off.
  • Draw balloon strings with black pen.
  • Paint the background with light blue inks.  
  • Try very hard not to be frustrated with sentiment, shading, etc.
  • Decide to quit stamping, quit blogging, sell all supplies, and watch more TV.  Art is overrated.
  • Decide all true artists are miserable; ergo I am a true artist.
  • Settle down and blog the card.
MOOD WHEN DONE = Frustrated but happy.

Jun 15, 2015

Waltzingmouse PJ Party: Everything

Dear Paperlicious Joan Bardee Waltzingmouse Stamps

I talk too much.  Not a lot.  Too much.  It's become a bit of a joke since I retired and am home alone most days.  When the husband walks in the door, I pretty much start talking and don't stop until it is time to say "good night."  So this card is for Mike -- he'll get the joke. 

I'm participating in the Waltzingmouse PJ Party and will enter this under "Old Pajamas" -- meaning the WMS sets were released in the past.

WANT TO MAKE THIS?

Supplies:

  • Waltzingmouse Two Step Sprig and Hello Happy Thanks (so LOVE this set!)
  • Assorted Ranger Distress yellow and green inks and Copic markers
  • Tombow pink, yellow, and red markers
  • Archival Ranger Black and Versamark inks
  • White embossing powder
  • Embossing Buddy
  • Heat Gun
  • White Linen Cardstock from Ellen Hutson and Recollections 65 lb. black cardstock
  • Stampin Up Vellum cardstock
  • Waltzingmouse Scalloped Stitched Rectangle Dies
  • Detail scissors
  • Ranger Crystal Stickles
  • Tattered Lace Detail glue (this dries clear when using vellum) 

Steps:

  • Stamp leaves with yellow ink and stamp again with green ink.
  • Cut leaves by hand.  (The linen cardstock is easy to cut.)
  • Shade leaves with yellow and Green Copic markers .
  • Stamp flowers with Tombow markers and color over with lighter marker.
  • Stamp center of flowers in black.
  • Cut flowers by hand.
  • Add Stickles to center of flower.
  • Let flowers dry.
  • Die cut vellum.
  • Cut and score A2 card with linen cardstock.
  • Trim black cardstock.
  • Stamp sentiment on black cardstock and emboss.
  • Adhere everything as shown.
MOOD WHEN DONE = Chatty!


Jun 14, 2015

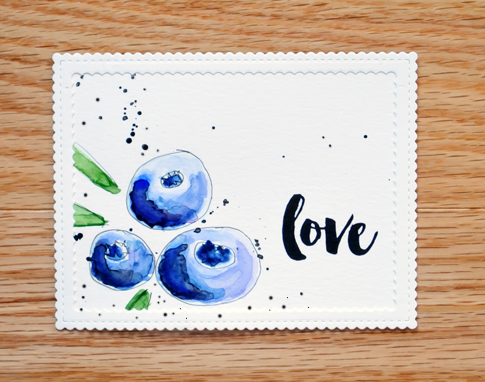
Muse Challenge 121: Blueberry Love with Waltzingmouse


joan bardee dear paperlicious waltzingmouse watercolor

Muse Challenge #121 contains an awesome card by the talented Michelle Ferguson, who blogs at I Card Everyone.  Michelle's card has 3 white flowers with large blue circular centers and a very fresh and summery blue, white, and green palette.  I fell in love with those colors. 

Since I'm fruit obsessed this summer, I saw blueberries and drew my own, adding a wonderfully scripted sentiment from Waltzingmouse. 

WANT TO MAKE THIS CARD?

Supplies:
  • watercolor paper
  • watercolors (I used Zig Gansai Tambai paints, which I just received)
  • paint brushes (sizes 4 and 6 round)
  • water
  • paper towels
  • black micron pen
  • Waltzingmouse Your Sparkle  (love this set!)
  • Ranger Archival Black dye ink
  • Waltzingmouse Scalloped Stitched Rectangle Dies  (also love)
  • die cut machine
  • adhesive
  • A2 white card
Steps:
  • trim watercolor paper to A2 size
  • check out pinterest for watercolored blueberries
  • draw blueberries
  • paint blueberries
  • draw leaves and paint
  • stamp sentiment
  • tear notebook paper and roughly cover berries as a loose mask
  • load up #6 paint brush with water and black paint and splatter.  Hope for the best.
  • stamp sentiment
  • die cut cute scalloped border using two dies to make frame
  • adhere frame
  • adhere frame to A2 card

MOOD WHEN DONE = happy!

Jun 12, 2015

Fed Up Challenge: Beating the Food Industry


No sugar, including juice, or simple carbs (or artifical sweetners) for 10 days.  Done. Finished.  Successful.
 
Substituted:
  • water with lemon for diet snapple, lemonade, diet coke, and everything else
  • fruit and almonds for popsicles that I thought were all fruit, but have added sugar.  And for cookies, popcorn, and candy
  • some brick like brown thing labeled as 100% whole wheat bread with no sugar (that got tossed) for fabulous bread from our farmer's market
  • 100% whole wheat pasta and a bunch of veggies sauteed in a little olive oil for some amazing spinach ravioli from a local Italian store
  • hamburgers (twice, once at a restaurant) with no roll instead of a Garden Burger with a roll at home and a burger with a roll at the restaurant   
  • broccoli instead of french fries (at restaurant)
  • salsa with no sugar for salsa with sugar
  • cheese and almonds in a plastic bag for lunch at the mall (I was by myself.)
  • nothing for popcorn at the movie
  • Fage yogurt fat free with fresh fruit instead of same thing with added honey  (Fage is 100 times better than any other yogurt...)
  • baba ghanoush with no added sugar for baba ghanoush with added sugar (labels people!)
  • No cereal for cereal with sugar (threw out the cereal). 
Watching the Fed Up movie had a major impact on my attitude towards food and the food industry.  It made me angry and anger is a great motivator. 

The relationship between public policy, the sugar industry, and what we eat is fascinating and infuriating.   And when did this happen?  In 1977, the government first proposed a recommended diet that called for reducing the amount of fat, sugar and sodium.  The sugar lobby went nuts and the final recommendations eliminated any mention of sugar.  Consumers listened and freaked out about fat.  That's when we got on the low fat, fat free craze.  Since fat tastes good, companies substituted sugar to make up for the fat.  We all got used to the taste of sugar in everything.  While the movie doesn't mention it, this is also when a lot of moms went to work outside the home, and prepared foods, take out, etc. took hold. The rest is history.  (I am NOT blaming moms here!) 

I realize I only heard one point of view, but look around and the reality is that we many of us are eating ourselves sick.  I volunteer at our hospital's gift shop.  Every single food item in the shop contains sugar or artificial sugar.  Every single one.  The costs -- emotional, financial, etc. are staggering.  If you are thinking about taking this challenge, strongly recommend getting pumped up by watching the movie first. 

The result:
  • lost 6 pounds
  • sleep better
  • feel good about doing something to improve my health
I didn't have any huge cravings (except over what I was drinking).  I didn't measure, keep track of what I was eating, or count calories.  I got hungry between meals and when that happened, ate an apple or had a handful of almonds and sipped some ice water.   But it's only 10 days.  10 days is easy.  A lifetime is not.

Problems with the Fed Up Challenge itself:  there is no clear list of what is and is not acceptable.  Triscuit has 100% whole wheat flour, salt and oil.  Was that ok?  Were tortilla chips ok?  Popcorn?  I didn't eat them because I quickly wanted to use this opportunity to lose weight.  But I think they are ok.  I think the point was to eliminate sugar and artificial sugar, and that was clear, but there was no message on the other stuff.  And I got recipes sent to me, one of which included white pasta! 

Is this sustainable?

No idea, but most 60 something overweight women do not change their eating habits.  That is reality.  However, my sense of fair play (don't want my money supporting bad public policy), and my desire not to have a stroke are strong motivators.  I want to sustain it.  Dinners (making separate dinners for us is not going to happen), eating out, and traveling will be a challenge and therefore, I intend to be reasonable about keeping with the challenge most of the time -- we love pizza!  I'll let you know how it goes!

Jun 10, 2015

Yum

Dear Paperlicious  by Joan Bardee  www.dearpaperlicious.com


Nothing says summer like a popsicle on a hot sunny day, preferably sitting on a deck listening to the waves roll in.  Since I'm not eating sugar, or artifical sweeteners right now, or listening to the waves roll in, thought I'd indulge by making a popsicle card!


Supplies:
  • watercolor paper
  • pencil
  • water
  • paint brushes
  • paper towels
  • watercolor paints (I used Tombow Markers and Peerless watercolors).  I need some watercolors other than these as I have limited colors and I find the Peerless and the Tombow work best on smaller images.
  • Mod Podge Dimensional Magic  (see explanation below)
  • craft sheet or other non porous surface
  • tolerance for imperfection  
  • A2 white card
  • adhesive
  • Ranger Archival Black ink
  • sentiment stamp (Simon Says Stamp You're So Sweet)
Steps:

1.  Cut watercolor paper and draw popsicle.
2.  Color in the popsicle.  I start at the outline and move in.  Once the outline is painted, erase pencil lines.  The more water you use, the harder the lines will be. 
3.  After you paint an initial layer of the popsicle itself, let dry.
4.  Work on the background.
5.  Add ink (I used a pink marker) on craft sheet and add a little Mod Podge Dimensional Magic (about a nickle size) and mix.  Paint that mixture on parts of the popsicle with a flat brush to add some texture and to act as a bit of a resist. 
6.  Let dry.  Because it's a thin mixture, the Dimensional Magic will dry while you get up and wash that brush.  You want to wash the paint brush right away or the Dimensional Magic will harden on the brush.
7.  Keep watercoloring the popsicle and the background until you are happy, making sure that each part is dry while you work on the other.  I did not bother a whole lot with light source so mine is sort of all over the place, but I'm making believe it was intentional....
8.  After it dries, hold your breath and stamp the sentiment if you want one. 
9.  Adhere dry panel to card.
10.  Mail the card to someone sweet.

Here's a few pics in progress that I took with my cell.

Started with the outline.


 Started to fill in the background. 


See the shiny part?  That's the initial layer of the Mod Podge Magic Dimensional.  


Thanks to all of you who took the time to comment here on the blog (and on Facebook and Instagram) on my last set of cards.  I appreciate the encouragement!


MOOD WHEN DONE = Summery!

Jun 8, 2015

Watercolored Fruits -- Beginning (and more on the Fed Up Challenge)

Edited to add: So honored to be selected by Kelly Latevola for her Casing Genius column.

I think we can agree that the term "genius" is open to interpretation here, but this is fun, and I am grateful to Kelly.  Kelly does fabulous work on her blog, You and Your Big Dreams.  Please check out the fabulous card she posted today, and if you have a moment, tell her how great it is.  Now I want to CASE Kelly!


My first attempt at drawing and watercoloring.   It started when I decided that I "must" have a pineapple stamp and found a few that I loved and then decided to try a few designs on my own.   Think I may need to buy that pineapple stamp!


Supplies:

  • Canson Watercolor Paper (any watercolor paper should be fine).  
  • Peerless watercolors
  • paint brush
  • water
  • paper towels
  • pencil
  • Big Shot (any die cut will work)
  • Black Zig Clean Color Real Brush Marker
Steps:

1.  Cut paper and score to make A2 card.
2.  Run folded card through Big Shot.  Be careful to use plates that are not scratched because the scratches will transfer to the paper.
3.  Draw fruit with pencil, but do a better job than I.  
4.  Paint, but do a better job!!  I found samples on pinterest to inspire.  Just search for watercolored fruit.  There are thousands!
5.  Add watermelon seeds with Black marker.
6.  Painted the black marker on a block, picked up with a wet paint brush and flicked on cards to add a few splatters.
7.  Just be happy that you tried.  I can find all sorts of reasons to criticize these, but I've always wanted to do this and I'm happy I tried.  I'll practice and show you more as I, hopefully, improve. 

MOOD WHEN DONE = Satisfied

****

Fed Up Challenge:  It's going great.  I didn't post an update yesterday because I've run out of things to say.  I'll post a final update later this week, when the 10 day challenge is over. 

Jun 7, 2015

Muse Challenge #120 - Butterflies


See those clear dots?  Dropped them right onto the card using Mod Modge Dimensional Magic.  LOVE that stuff!

Made this card in response to the latest Muse Challenge.  Here is the beautiful inspiration photo by the super talented Vicki Dutcher. 


Vicki's blog, All I Do is Stamp,  is full of inspiration.  I love the way she emphasizes color!  And she stamps and posts all the time. 

I kept a white background with a black sentiment and three butterflies.  I changed the colors, but think I kept pretty close this time to the Muse. 

MOOD WHEN DONE = Flighty!

Jun 6, 2015

Fed Up Challenge: Day Five

Four pm is the worst time of the day.  Dinner seems hours away and cookies beckon.  In short, I am hungry.  Didn't matter a whit today that I had eaten a healthy fiber full lunch.  I. was. hungry.  It's the first time since I started this little adventure that I was uncomfortably hungry.  Had 2 dates and a handful of almonds and just handled it.

So I got through Day Five.  A friend asked if I feel any different.  I am sleeping better, but it is hard to know if the lack of sugar is the reason.  I do not care why!  The other thing I notice is that almonds now taste slightly sweet.  Another friend asked me if I've lost any weight.  I'll wait until the end of the 10 day challenge to report any changes.

Thanks for the encouragement!  This is fun.

Jun 5, 2015

Fed Up Challenge: Day Four

We live in one of those "walkable" neighborhoods -- suburban but built to encourage folks to walk around and buy and eat.   Today, walking to the dry cleaners, I had my choice of about 20 restaurants, not including the Starbucks, "counter stuff" at Target, gelato, ice cream, chocolate, and pastry shops.   There's sugar and simple carbs every 35 feet.

Looking at folks entering the burger joint, I shake my head -- stop, death is beyond that door!  Milk shakes -- listen, you are killing yourself and your kids!!  Don't get that Pad Thai, it's full of sugar and white flour!  Run.  Save your life.  Now. Before you end up LIKE ME. 

Man, I miss that stuff.  I'd almost trade all my distress inks for a bowl of mac and cheese.  Almost.

I escaped with nothing!  (Helps to bring no money).

Day Four concludes and I'm still Fed Up with sugar and simple carbs.  Not an ounce has passed my lips and I'm in danger of becoming one of my least favorite types of people -- a zealot.  I swear that once the 10 day challenge is done, my blog will not be full of holier than thou anti sugar posts.   Either I'll keep it up and shut up about it, or I'll be back eating the crack. 

Note to self -- promised to make Mike's fave Brownie Cheesecake for him.  ARRGH. 

Jun 4, 2015

Fed Up Challenge Day Three (at the Gift Shop)


Day Three of the Fed Up Challenge was also the first day of my volunteering at a local hospital's gift shop.  So I spent today selling, among other things, candy bars and cheddar cheese potato chips. 

LOVED the gift shop scene -- enough chit chat to keep me happy, the money raised goes to a good cause, and it exercises my body (standing and walking) as well as my brain. 

Oh, the irony of selling all that sugar to people on the third day of my not eating sugar.  I looked at the buyers and felt bad for them, like I'm better than they are because I've had no sugar for 3 days....

I am on board with this challenge, particularly since I watched Fed Up the movie.


This movie lays out the physiological and political reasons why we are in the obesity health disaster that we are in -- including the fact that many "thin" people are "fat inside".  Fascinating stuff.   It makes the argument that a calorie is not a calorie and that traditional diet and exercise is doomed to fail.  It made sense to me, but I am sort of ignorant on this topic. 

It cost $3.99 to rent the movie on Amazon and I watched it on my laptop while I chopped brocolli and other foods for dinner.  You can also buy the DVD or access it in other ways.   I recommend it. 

I know I can do the 10 days.  The issue is can I make this a life thing?  I do not know.  Just looking at the picture of Snickers gets my brain on fire...

Jun 3, 2015

Fed Up Challenge Day Two -- and a Card


First, the Fed Up Challenge Day 2 -- 

Ate yogurt, fruit, veggies, olive oil, baba ghanoush, some really weird whole wheat bread/sawdust, cheese, almonds, and water!  

Have not experienced food cravings, sugar cravings, or a whole lot of hunger.  I like this food and don't really miss the sweets/carbs.  I have no idea why!!  It may just be the novelty of a new thing.  Let's see how tomorrow goes. 

*****

And now the card.

Supplies:

  • linen cardstock
  • ink in 3 colors -- dye ink works best when overlapping colors.
  • Circle stamps.  I used Hero Arts Brush Strokes (this one has a fun crosshatch design and is irregular, which make it more interesting)
  • Sentiment stamp.  I used Simon Says Stamp Sending Happy Thoughts. 
Steps:

1.  Make A2 card.
2.  Stamp sentiment first.  
3.  Stamp the set of 3 circles in a triangle pattern.  Stamp off a few times to create a paler color.
4.  Stamp the single circles as shown.

MOOD WHEN DONE = happy!

Jun 2, 2015

Fed Up Challenge: Day One

Day One:

Note:  as I write this, my very thin husband (he's a runner) is on his second bowl of potato chips. ** Sigh. 

Day One is in the books.  Rocked it.  Take that, Mint Milanos, Oreos, and the Queen of the Pantry -- Hershey Nuggets. 

Ate what was in the house that fit the rules -- fruit, dried fruit, cheese, greek yogurt, baba ghanoush (checked the label, no sugar), carrots, and more cheese. 

Around 4 pm really wanted some carbs.  As in started to regret opening my big mouth on the internet about taking the challenge.  So ate some watermelon and then took a walk. 

Came back with hamburger and the fixins to make guacamole.  Added some brown rice and dinner was good.  We rarely eat meat at home so having a burger felt like a treat. 

Am not craving anything after dinner.  Feel full.  Never feel full.  Odd. 

I'll let you know if I gain or lose any weight, sleep better, or stop the cough I've had since August that no doc has figured out.   I'm not asking for much, am I?

** Just finished his bowl.  The empty bowl sits there, mocking me.  If he goes for a third bowl, I may cry.


Jun 1, 2015

Taking the 10 Day Fed Up (Sugar Free Challenge): The Night Before


Tomorrow, June 2nd, I start the Fed Up Challenge.   I'm challenged (to say the least) to have no added sugar or artificial sugar in any form.  Fruits are ok because, according to the folks behind the challenge, the fiber in the fruits slows down the absorption of the sugar.  White flour is not ok, because the body immediately converts it to sugar.  Good bye lemonade, Diet Snapple, cookies, and the Thai restaurant across the street from my house.   Hello protein, cheese, nuts, beans, vegetables and fruits.

I'm looking to see what affect going sugar free will have on my sleeping, energy, and who knows what else.  I don't know what I am going to drink, as I do. not. like. water. 

Do Mint Milanos have sugar?

I'll be posting every day with an update!  Wish me luck!

Watercolor Wash


Today I am sharing a fun way to color cards, while keeping the design simple.  This design works best with open images used to make a casual card.   


Stamps:  Simon Says Stamp Sweet Fruits and Avery Elle Bonjour


Stamps:  Waltzingmouse Funky Feathers


Stamps:  Simon Says Stamp Sending Happy Thoughts
Supplies Needed:

Watercolor paper, cut and scored to make A2 card
Images (open images work best) and sentiment
Ranger Archival Black Ink (or other waterproof ink -- Memories Dye Black will work)
Watercolors (I used Tombow markers)
Paint brush
Water
Paper Towel

Optional:

Die cut machine (to flatten card)
Embellishments

Steps:

1.  Cut watercolor paper to 8.5" x 4.25".  Score and fold in center.
2.  Place folded card in die cut machine, run through to flatten.
3.  Stamp sentiment first.  See the fruit card?  The original sentiment I used was tiny and looked odd.  I used a larger sentiment and stamped on black cardstock for contrast. 
4.  Stamp images in a random fashion surrounding the sentiment.
5.  Wash some watercolor paints over image.  Staying in lines discouraged!
6.  Add bling, etc. as desired. 
7.  Once dry, run folded card through die cut  machine again to re-flatten.

MOOD WHEN DONE:  Happy!